A body measurement chart is a simple way to record your measurements, understand changes over time, and find clothing sizes that fit more comfortably. Whether you are tracking fitness progress, sewing a garment, shopping online, or setting personal wellness goals, consistent measurements can give you useful information beyond what a scale shows.
The key is to measure the same areas in the same way each time. A flexible measuring tape, a few minutes, and a place to write down your results are usually all you need. This guide explains which measurements to take, how to take them accurately, how often to update your chart, and how to use the results realistically.
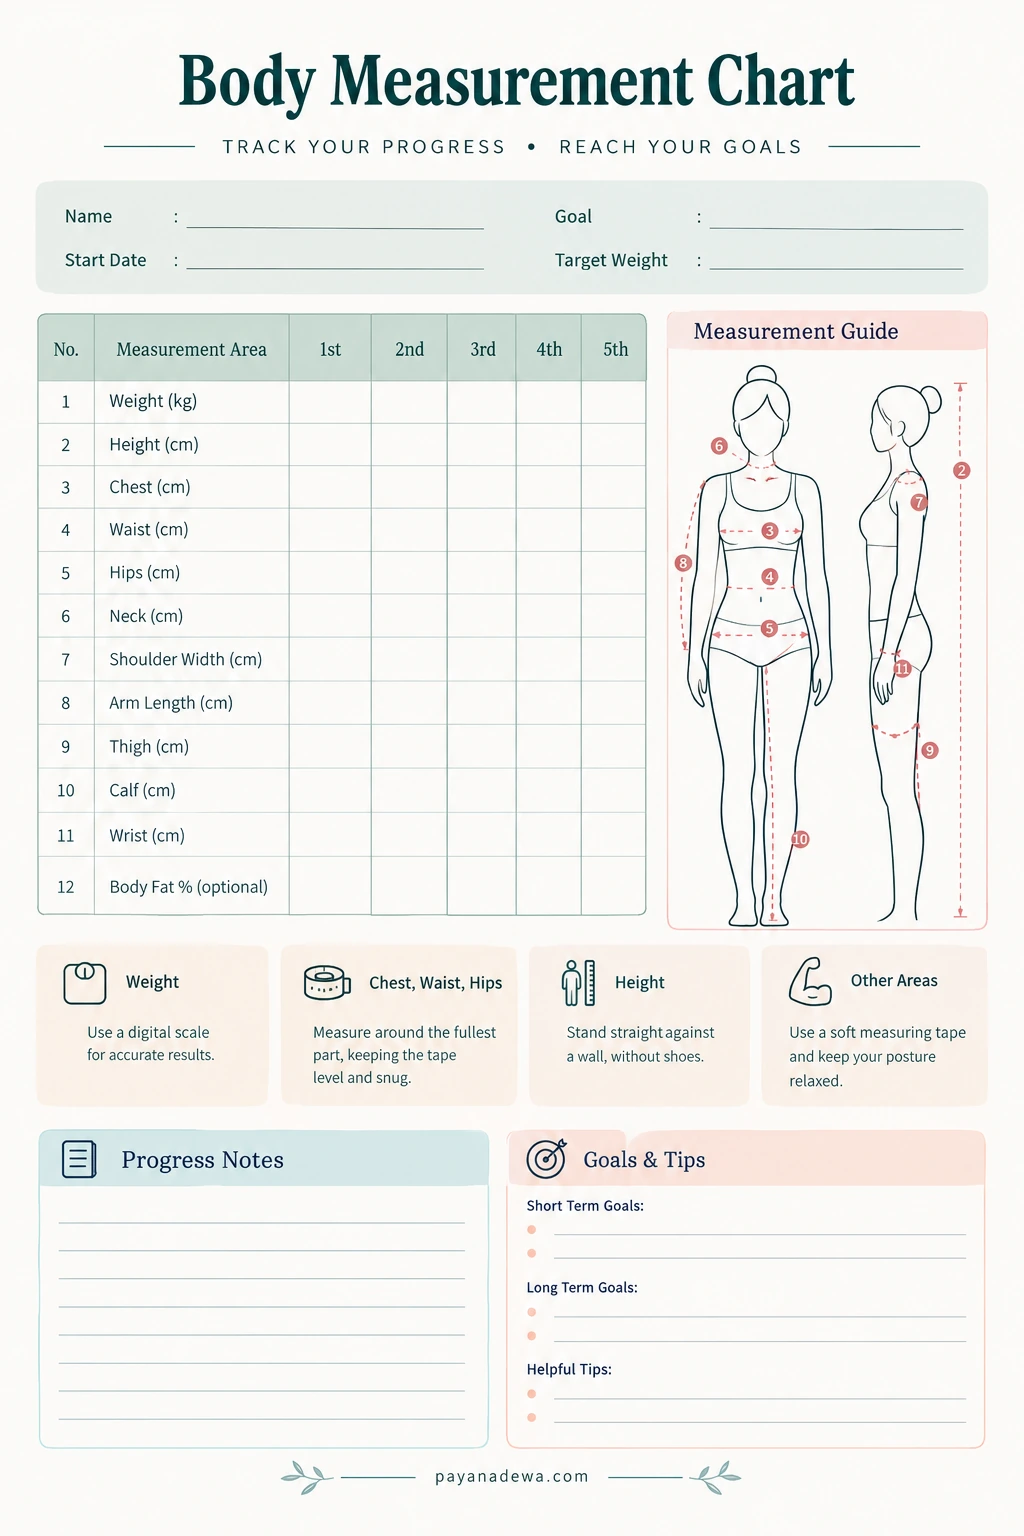
What Is a Body Measurement Chart?
A body measurement chart is a record sheet for noting measurements such as weight, waist, hips, chest, shoulders, arms, thighs, and other areas. Depending on your goal, it may also include height, a date column, notes, and space to compare results from different weeks or months.
There is no single chart that suits everyone. A tailor may need detailed garment measurements, while someone monitoring a fitness routine may focus on waist, hips, chest, and limb measurements. Choose only the fields that are relevant to your purpose, and leave out anything you do not need.
Why Should You Track Body Measurements?
Understand changes beyond body weight
Body weight can change for many reasons, including hydration, digestion, and normal day-to-day fluctuations. Measurements can provide another point of reference. For example, your waist or thigh measurement may change while your weight stays relatively stable. Neither number tells the whole story, but together they can help you see a broader pattern.
Choose clothing sizes more confidently
Size labels vary between brands, countries, and garment styles. Checking your bust or chest, waist, hips, and other relevant measurements against a brand’s size chart is often more useful than relying on the size you usually buy. For fitted garments, follow the brand or pattern maker’s instructions about whether to measure your body or an existing garment.
Keep personal goals specific
Writing measurements down can make a goal easier to review. Rather than judging progress from memory, record the date, measurement, and any useful context, such as a change in training routine or the fit of a garment. Measurements are information, not a score of your worth or health.
Which Measurements Should You Include?
A useful body measurement chart can include the following areas. You do not need to track every one; select the measurements that fit your needs.
- Weight: Record it only if it is relevant to your goal, using the same scale and similar conditions each time.
- Height: Usually measured while standing straight against a wall without shoes. Height is generally recorded less frequently than circumference measurements.
- Chest or bust: Measure around the fullest part of the chest or bust, keeping the tape level.
- Waist: Measure around your natural waist or the specific waist position requested by a clothing size chart. Do not pull your stomach in.
- Hips: Measure around the fullest part of the hips and seat, with feet together and the tape level.
- Neck: Measure around the base of the neck if it is needed for tailoring or a particular tracking plan.
- Shoulders: For garment fitting, follow the pattern or tailor’s directions because shoulder width is often measured between specific points rather than around the body.
- Arm: Depending on the purpose, record upper-arm circumference or arm length. These are different measurements.
- Thigh and calf: Measure circumference at a clearly defined point and use that same point in future sessions.
- Wrist: Measure around the wrist if needed for accessories, garment fitting, or personal tracking.
- Body-fat percentage: Treat this as an optional estimate from a suitable method or device, not as a direct tape measurement. Different methods can produce different results.
How to Take Accurate Body Measurements
1. Prepare the right tools
Use a flexible, non-stretch measuring tape. A mirror or a helper can make it easier to keep the tape level, especially around the back. Keep your chart, pen, and a consistent measurement plan nearby. If you are measuring for sewing, use the instructions provided with the pattern or by your tailor.
2. Stand in a natural position
Stand comfortably with your weight balanced and your muscles relaxed. Avoid deliberately changing your posture, holding your breath, or tightening your abdomen to influence the result. For circumference measurements, the tape should lie flat against the body without compressing the skin.
3. Keep the tape level and snug
Check the tape in a mirror when possible. It should be parallel to the floor for most circumference measurements, unless a specific garment guide says otherwise. Keep it snug but not tight. A twisted tape or a tape that slopes up at the back can affect the reading.
4. Use the same landmarks every time
Consistency matters more than collecting lots of numbers. For example, if you measure your thigh, decide where the tape will sit and repeat that placement at each session. Write down any special instructions so you can follow the same method later.
5. Record the date and units
Write measurements in either centimetres or inches and use the same unit throughout your chart. Include the date for each set of results. If a measurement seems unusual, take it again rather than immediately treating it as a real change.
How Often Should You Update Your Chart?
The best schedule depends on why you are measuring. For clothing, take fresh measurements when ordering a fitted garment or whenever your fit needs have changed. For general progress tracking, every two to four weeks may be enough for many people. Measuring every day is rarely necessary and can make normal fluctuations feel more important than they are.
Try to measure under similar conditions each time. If you are tracking circumference, choose a consistent time of day and similar clothing. Note relevant circumstances that may affect a result, such as temporary bloating or a change in routine. Look for trends across several entries instead of drawing conclusions from one reading.
Common Body Measurement Mistakes to Avoid
- Pulling the tape too tightly: This can make a circumference measurement smaller than it really is.
- Letting the tape sag or tilt: Check that it is level and lies flat against the body.
- Measuring over bulky clothing: Lightweight, close-fitting clothing or direct measurement as appropriate can improve consistency.
- Changing measurement locations: Use the same anatomical landmark each time.
- Mixing inches and centimetres: Label the units clearly and keep them consistent.
- Comparing results taken in different ways: A result is most useful when the method and conditions are similar.
- Focusing on a single number: Measurements do not independently diagnose health or define fitness. Interpret them in context.
How to Use a Printable Body Measurement Chart
A printable chart keeps your records in one place and makes comparisons straightforward. Start by writing your name or a private identifier, the start date, and the purpose of your tracking. Add a new column for each check-in, or print a fresh copy when you need more space.
- Choose the measurement fields that match your goal.
- Write the date at the top of each new measurement column.
- Use the same tape, units, posture, and measurement points whenever possible.
- Add brief notes if a reading was difficult to take or conditions were different.
- Store the chart somewhere private, especially if it contains personal information.
- Review the overall pattern occasionally rather than reacting to every small difference.
If you are using measurements for clothing, compare them with the specific brand’s or sewing pattern’s sizing instructions. If you are tracking fitness, combine measurements with other meaningful indicators such as strength, stamina, energy, and how your clothes fit. If measurements cause anxiety or encourage unhealthy habits, consider taking a break and speaking with a qualified health professional.
Frequently Asked Questions
What is the most important body measurement?
It depends on your goal. Waist, chest or bust, and hips are often useful for clothing fit, while a tailor may also need shoulder, sleeve, inseam, or other garment-specific measurements. There is no single measurement that is most important for everyone.
Should I measure in inches or centimetres?
Either unit works. Choose the unit used by your clothing size chart or the one you find easiest, then use it consistently. If you convert units, label the converted result clearly and avoid rounding too early.
Can a body measurement chart show fitness progress?
It can help you observe changes over time, but it cannot explain their cause on its own. Measurements are best treated as one optional tracking tool alongside how you feel, what you can do, and any guidance relevant to your personal circumstances.
Can I use the same chart for tailoring and fitness?
You can, but the required measurements may differ. A general chart is useful for basic tracking, while tailoring often requires precise measurements taken at specific points. Follow the garment pattern or tailor’s instructions when fit is the priority.
Conclusion
A body measurement chart is a practical tool for recording measurements, checking clothing fit, and reviewing personal progress over time. For reliable results, use a flexible tape, keep it level and comfortably snug, measure the same points, and record the date and units. Choose a schedule that suits your purpose and focus on meaningful trends rather than small day-to-day changes.
Download or print a chart, select only the fields you need, and make consistent record-keeping part of your routine. Used thoughtfully, a simple measurement chart can help you make better-informed decisions without turning numbers into judgments about your body.